文章目录
- 01、Mybatis 意义
- 02、Mybatis 快速入门
- 04、Mapper 代理开发
- 05、Mybatis 配置文件
- 07、查询所有&结果映射
- 08、查询-查看详情
- 09、查询-条件查询
- 10、查询-动态条件查询
- 多条件动态查询
- 单条件动态查询
- 11、添加&修改功能
- 添加功能
- 修改功能
- 12、删除功能
- 删除一个
- 批量删除
- 13、参数传递
当前项目里面的 CRUD 接口都是基于前人已经封装好的 API、或者直接使用 mybatis-generator 插件生成的,将其底层和数据库打交道的关键层 Mybatis 进行了封装。但是我认为了解持久层原理还是很有必要的,因此决定从 Mybatis 基本用法出发,进一步地剖析其底层的一些关键源码,对 Mybatis 有个比较清晰的把握。
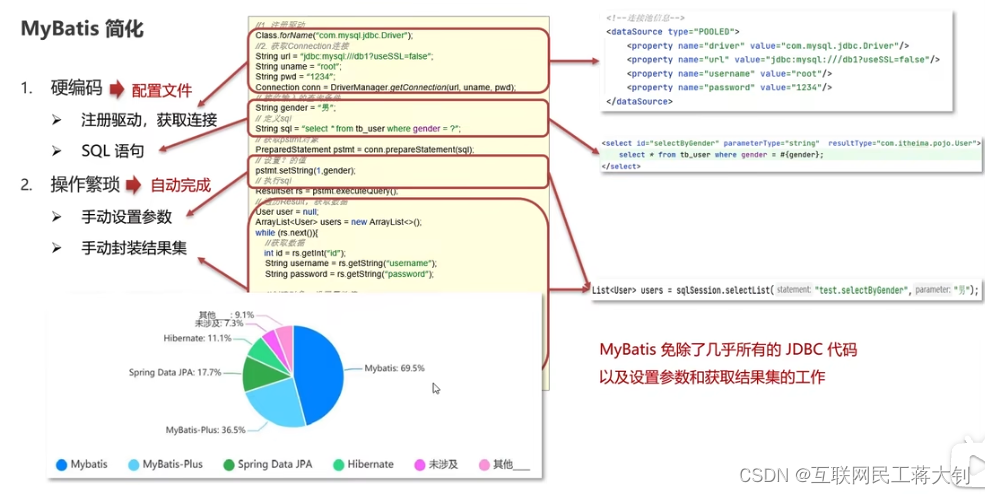
01、Mybatis 意义
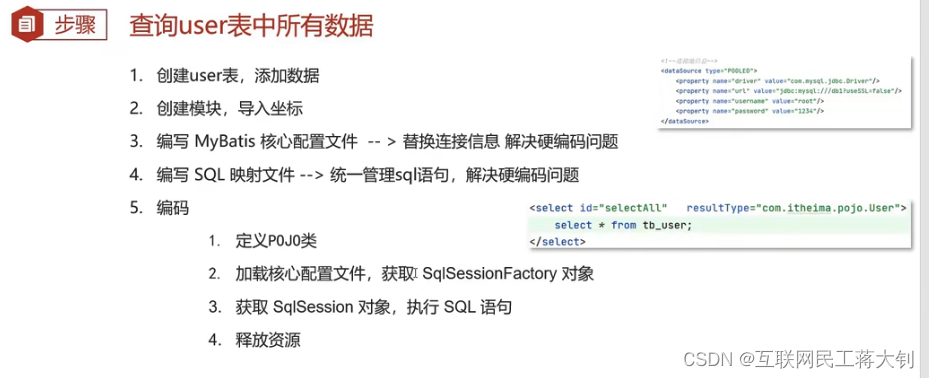
02、Mybatis 快速入门
先写了一堆 pom.xml 依赖
<?xml version="1.0" encoding="UTF-8"?>
<project xmlns="http://maven.apache.org/POM/4.0.0"
         xmlns:xsi="http://www.w3.org/2001/XMLSchema-instance"
         xsi:schemaLocation="http://maven.apache.org/POM/4.0.0 http://maven.apache.org/xsd/maven-4.0.0.xsd">
    <modelVersion>4.0.0</modelVersion>

    <groupId>com.jxz</groupId>
    <artifactId>mybatis-demo</artifactId>
    <version>1.0-SNAPSHOT</version>

    <properties>
        <maven.compiler.source>8</maven.compiler.source>
        <maven.compiler.target>8</maven.compiler.target>
        <project.build.sourceEncoding>UTF-8</project.build.sourceEncoding>
    </properties>

    <dependencies>
        <dependency>
            <groupId>org.mybatis</groupId>
            <artifactId>mybatis</artifactId>
            <version>3.5.5</version>
        </dependency>

        <dependency>
            <groupId>mysql</groupId>
            <artifactId>mysql-connector-java</artifactId>
            <version>5.1.46</version>
        </dependency>

        <dependency>
            <groupId>junit</groupId>
            <artifactId>junit</artifactId>
            <version>4.13</version>
            <scope>test</scope>
        </dependency>

        <dependency>
            <groupId>org.slf4j</groupId>
            <artifactId>slf4j-api</artifactId>
            <version>1.7.25</version>
        </dependency>

        <dependency>
            <groupId>ch.qos.logback</groupId>
            <artifactId>logback-classic</artifactId>
            <version>1.2.3</version>
        </dependency>

        <dependency>
            <groupId>ch.qos.logback</groupId>
            <artifactId>logback-core</artifactId>
            <version>1.2.3</version>
        </dependency>
    </dependencies>

</project>
每个基于 MyBatis 的应用都是以一个 SqlSessionFactory 的实例为核心的。SqlSessionFactory 的实例可以通过 SqlSessionFactoryBuilder 获得。而 SqlSessionFactoryBuilder 则可以从 XML 配置文件或一个预先配置的 Configuration 实例来构建出 SqlSessionFactory 实例。
从 XML 文件中构建 SqlSessionFactory 的实例非常简单,建议使用类路径下的资源文件进行配置。 但也可以使用任意的输入流(InputStream)实例,比如用文件路径字符串或 file:// URL 构造的输入流。MyBatis 包含一个名叫 Resources 的工具类,它包含一些实用方法,使得从类路径或其它位置加载资源文件更加容易。
Mybatis-config.xml
<?xml version="1.0" encoding="UTF-8" ?>
<!DOCTYPE configuration
        PUBLIC "-//mybatis.org//DTD Config 3.0//EN"
        "http://mybatis.org/dtd/mybatis-3-config.dtd">
<configuration>
    <environments default="development">
        <environment id="development">
            <transactionManager type="JDBC"/>
            <dataSource type="POOLED">
                <property name="driver" value="com.mysql.jdbc.Driver"/>
                <property name="url" value="jdbc:mysql:///mybatis?useSSL=false"/>
                <property name="username" value="xxx"/>
                <property name="password" value="xxx"/>
            </dataSource>
        </environment>
    </environments>
    <mappers>
        <mapper resource="org/mybatis/example/BlogMapper.xml"/>
    </mappers>
</configuration>
-
编写 SQL 映射文件 UserMapper.xml
<?xml version="1.0" encoding="UTF-8" ?> <!DOCTYPE mapper PUBLIC "-//mybatis.org//DTD Mapper 3.0//EN" "http://mybatis.org/dtd/mybatis-3-mapper.dtd"> <!--namespace 命名空间--> <mapper namespace="test"> <select id="selectAll" resultType="com.jxz.pojo.User"> select * from tb_user; </select> </mapper> -
定义和 SQL 映射文件有关的实体 User
-
Mybatis-config.xml 加载映射文件
<!--        加载 sql 映射文件-->
  <mappers>
      <mapper resource="UserMapper.xml"/>
  </mappers>
- 创建 SqlSession 对象,执行 sqlSession 查询方法
package com.jxz;

import com.jxz.pojo.User;
import org.apache.ibatis.io.Resources;
import org.apache.ibatis.session.SqlSession;
import org.apache.ibatis.session.SqlSessionFactory;
import org.apache.ibatis.session.SqlSessionFactoryBuilder;

import java.io.IOException;
import java.io.InputStream;
import java.util.List;

/**
 * @Author jiangxuzhao
 * @Description Hello World Demo
 * @Date 2024/6/14
 */
public class MyBatisDemo {
    public static void main(String[] args) throws IOException {
        // 1. 创建 SqlSessionFactory
        String resource = "mybatis-config.xml";
        InputStream inputStream = Resources.getResourceAsStream(resource);
        SqlSessionFactory sqlSessionFactory = new SqlSessionFactoryBuilder().build(inputStream);

        // 2. 获取 SqlSession 对象
        SqlSession sqlSession = sqlSessionFactory.openSession();

        // 3. 执行 sql
        List<User> result = sqlSession.selectList("test.selectAll");
        System.out.println(result);

        // 4. 释放资源
        sqlSession.close();
    }
}
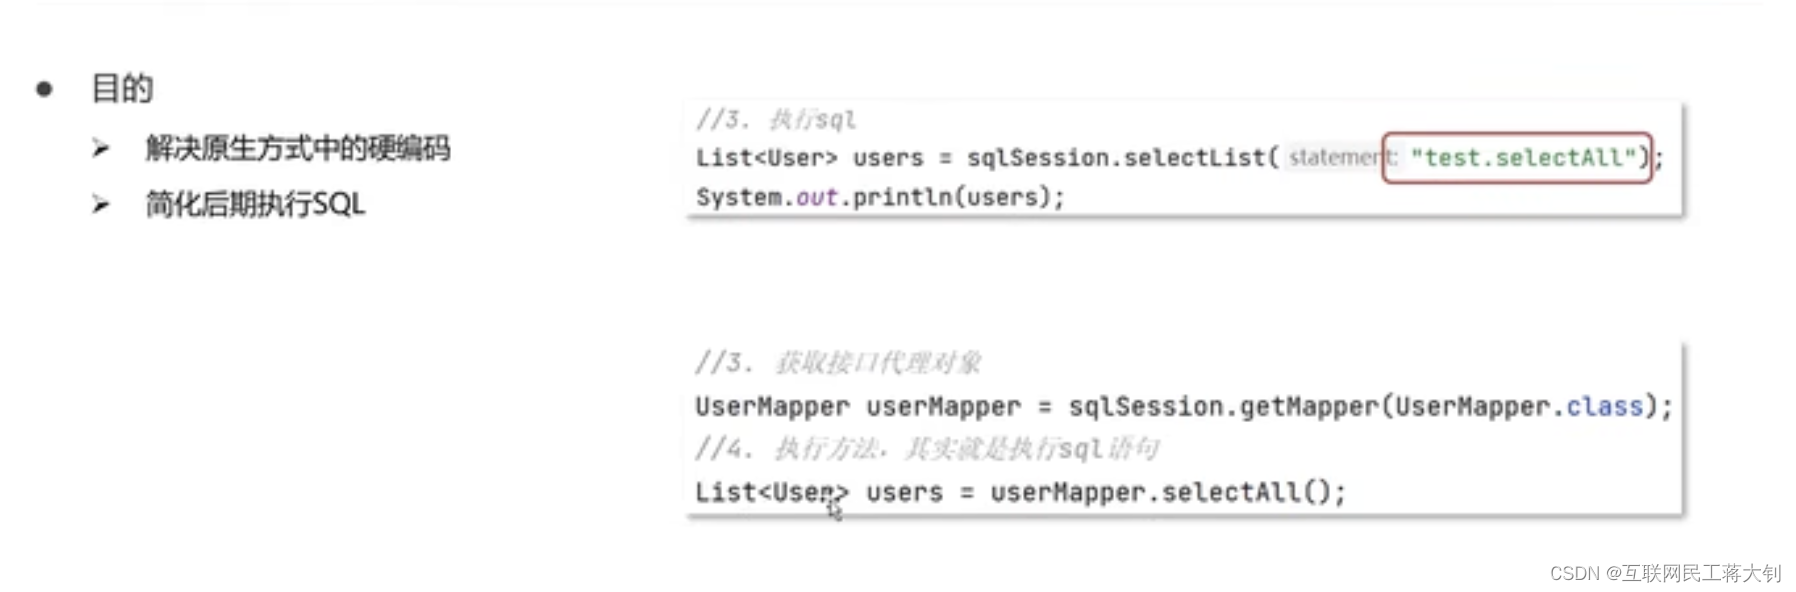
04、Mapper 代理开发
上面执行 sql 的时候还是碰到了硬编码
改成 Mapper 代理可以基于接口开发,但是有些约定需要遵循
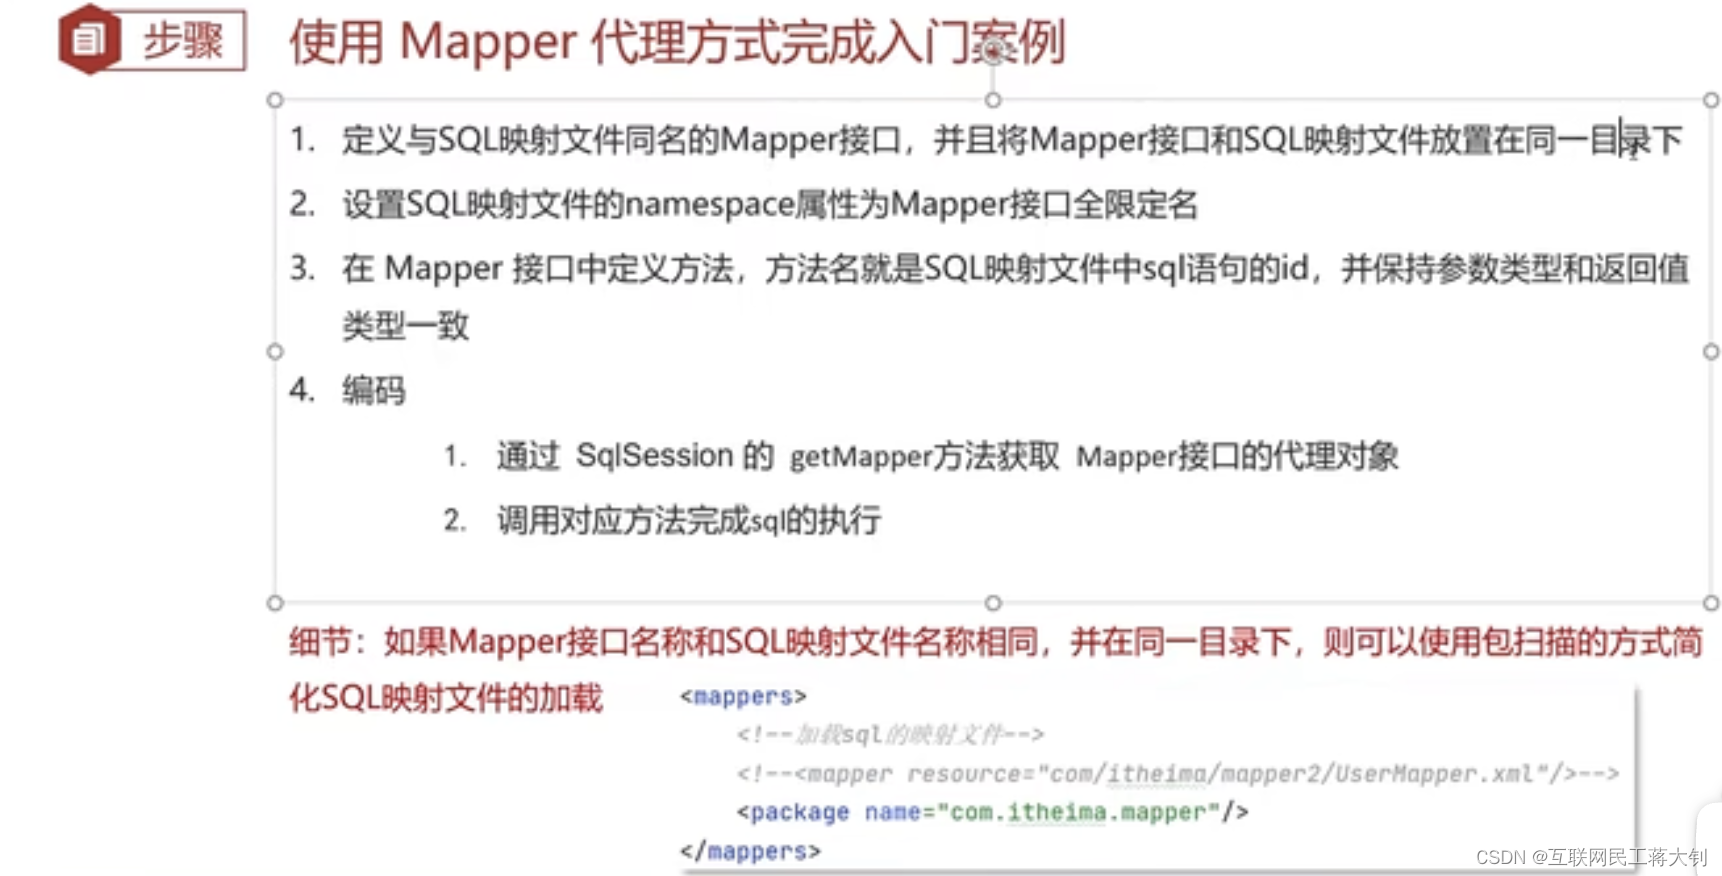
- 定义同名的 Mapper Interface 并和 SQL 映射文件放在同一目录下(java 包和 resources 包最后编译都会放在一块),我项目中放在 com/jxz/mapper 目录下
- 修改 UserMapper.xml 中的 namespace = 接口全限定名 com.jxz.mapper.UserMapper
<?xml version="1.0" encoding="UTF-8" ?>
<!DOCTYPE mapper
        PUBLIC "-//mybatis.org//DTD Mapper 3.0//EN"
        "http://mybatis.org/dtd/mybatis-3-mapper.dtd">
<!--namespace 命名空间-->
<mapper namespace="com.jxz.mapper.UserMapper">
    <select id="selectAll" resultType="com.jxz.pojo.User">
        select * from tb_user;
    </select>
</mapper>
- Mapper 接口中定义方法,与SQL 映射文件 id、参数类型、返回值一致。
package com.jxz.mapper;

import com.jxz.pojo.User;

import java.util.List;

/**
 * @Author jiangxuzhao
 * @Description
 * @Date 2024/6/14
 */
public interface UserMapper {
    List<User> selectAll();
}
- Mybatis-config 配置文件加载 SQL 映射文件的路径需要修改,改成 UserMapper 接口以及 SQL 映射文件共同所在的包路径
    <mappers>
<!--        Mapper 代理方式-->
        <package name="com.jxz.mapper"/>
    </mappers>
- 从 SqlSession 中拿到代理对象查询
package com.jxz;

import com.jxz.mapper.UserMapper;
import com.jxz.pojo.User;
import org.apache.ibatis.io.Resources;
import org.apache.ibatis.session.SqlSession;
import org.apache.ibatis.session.SqlSessionFactory;
import org.apache.ibatis.session.SqlSessionFactoryBuilder;

import java.io.IOException;
import java.io.InputStream;
import java.util.List;

/**
 * @Author jiangxuzhao
 * @Description Mapper 代理方式
 * @Date 2024/6/14
 */
public class MybatisDemo2 {
    public static void main(String[] args) throws IOException {

        // 1. 创建 SqlSessionFactory
        String resource = "mybatis-config.xml";
        InputStream inputStream = Resources.getResourceAsStream(resource);
        SqlSessionFactory sqlSessionFactory = new SqlSessionFactoryBuilder().build(inputStream);

        // 2. 获取 SqlSession 对象
        SqlSession sqlSession = sqlSessionFactory.openSession();

        // 3. 获取 UserMapper 代理对象
        UserMapper userMapper = sqlSession.getMapper(UserMapper.class);
        List<User> users = userMapper.selectAll();
        System.out.println(users);

        // 4. 释放资源
        sqlSession.close();
    }
}
执行路径就是 SqlSession 根据 mybatis-config.xml 中 下配置的包路径找到 UserMapper Interface,相同目录下找到 UserMapper.xml SQL 配置文件;在调用 selectAll 方法时对应到 SQL 配置文件中的 id = ,也就找到了配置的 SQL 语句。
05、Mybatis 配置文件
就是前面为了生成 SqlSessionFactoryBuilder 的 mybatis-config.xml 文件
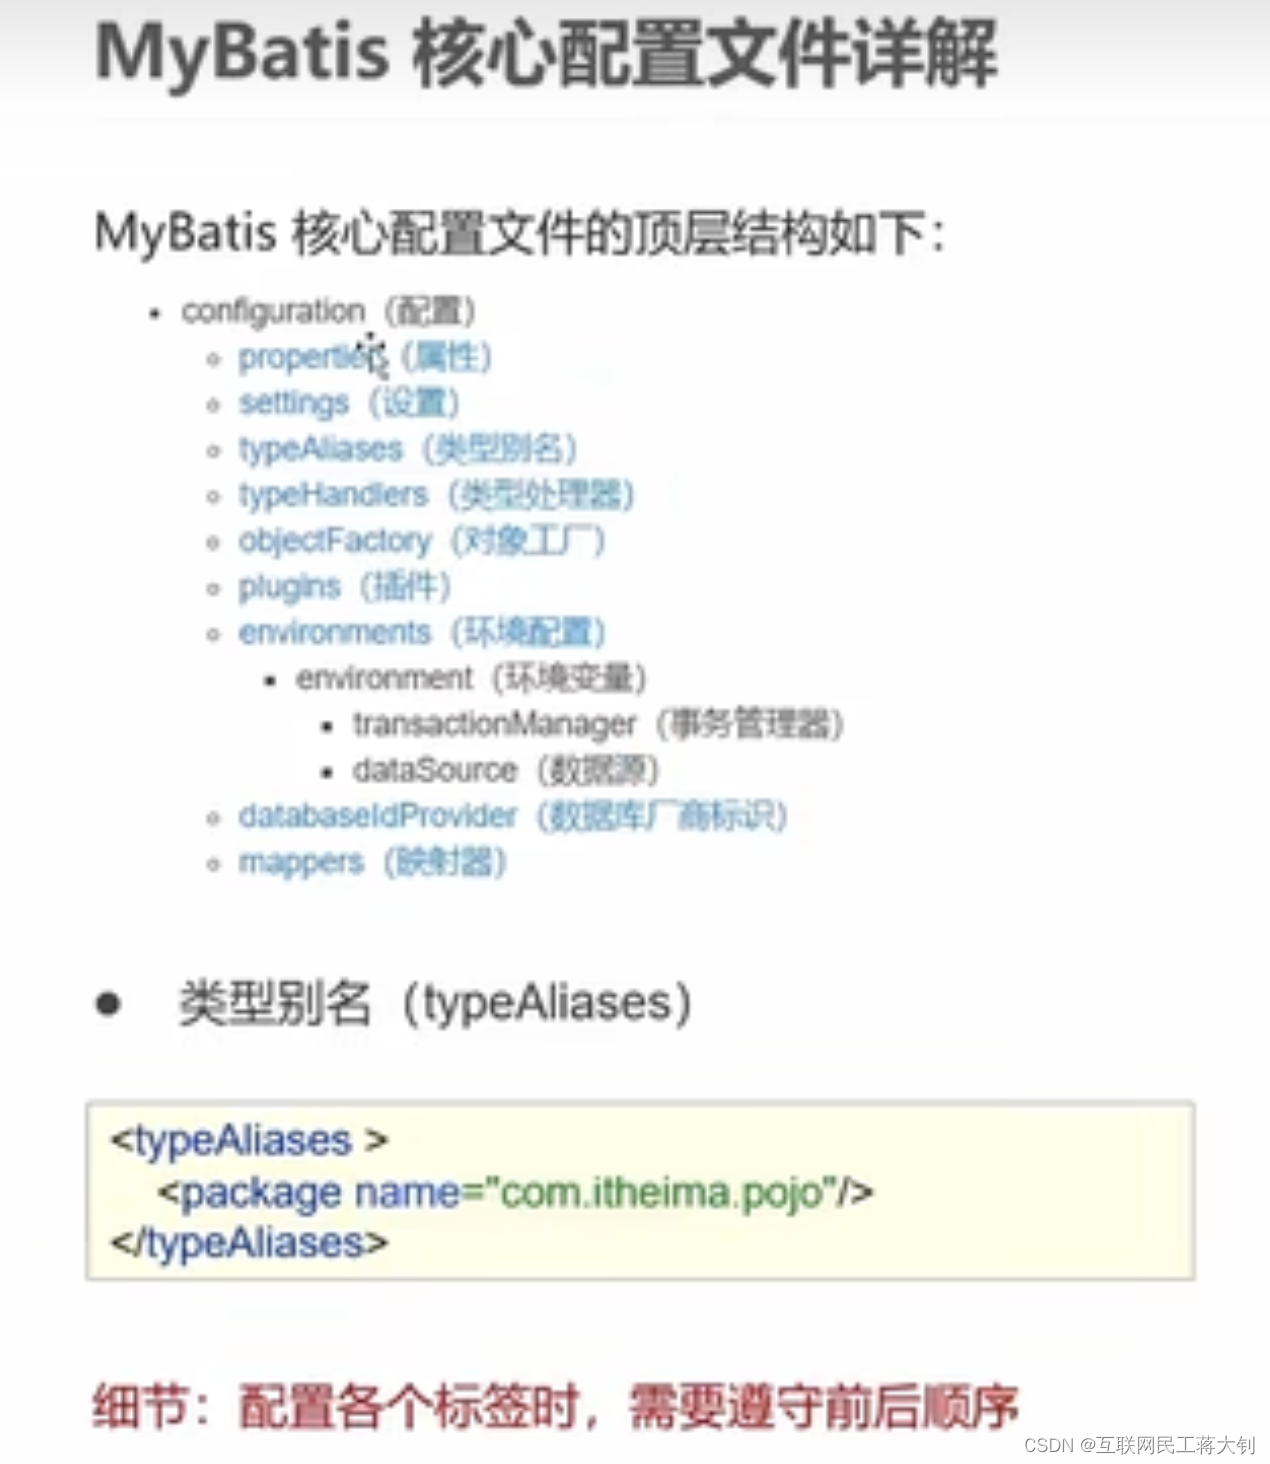
我在这里配置了个别名
<typeAliases>
    <package name="com.jxz.pojo"/>
</typeAliases>
这样子在 UserMapper.xml SQL 配置文件中,resultType 就可以直接使用别名了,即 Pojo 类的首字母小写的非限定类名
<!--Mappper 代理模式为接口全限定名-->
<mapper namespace="com.jxz.mapper.UserMapper">
    <select id="selectAll" resultType="user">
        select * from tb_user;
    </select>
</mapper>
07、查询所有&结果映射
像 04 的 UserMapper 代理开发一样,这章使用 BrandMapper 进行更复杂场景的开发,包含结果映射的相关知识。
数据库表的字段名称 和 实体类的属性名称不一样,不能自动封装数据。
<resultMap id="brandResultMap" type="brand">
<!--
id: 完成主键字段映射
column: 表的别名
property: 实体类的属性名
result: 完成一般字段映射
column: 表的别名
property: 实体类的属性名
-->
    <result column="brand_name" property="brandName"/>
    <result column="company_name" property="companyName" />
</resultMap>
<select id="selectAll" resultMap="brandResultMap">
    select *
    from tb_brand;
</select>
resultMap:
    1. 定义 <resultMap> 标签
    2. 在<select> 标签中,使用 resultMap 属性替换 resultType 属性
08、查询-查看详情
Brand selectById(int id);
<select id="selectById" resultMap="brandResultMap">
        select *
        from tb_brand
        where id = #{id}
</select>
09、查询-条件查询
多条件查询
总共有3种传参方式

<!--
    条件查询
-->
    <select id="selectByCondition" resultMap="brandResultMap">
        select *
        from tb_brand
        where status = #{status}
        and company_name like #{companyName}
        and brand_name like #{brandName}
    </select>
/**
 *  条件查询
 *  参数接收
 *  1. 散装参数:如果方法中有多个参数,需要使用 @Param("SQL占位符名称")
 *  2. 对象参数:对象的属性名称要和参数的占位符一致
 *  3. map 集合参数
 * @return
 */
List<Brand> selectByCondition(@Param("status") int status, @Param("companyName") String companyName, @Param("brandName") String brandName);


List<Brand> selectByCondition(Brand brand);

List<Brand> selectByCondition(Map map);
10、查询-动态条件查询
多条件动态查询
上面的条件查询在 SQL 配置文件中写死了,如果 status,companyName,brandName任意一个条件没传递,类似 status = null,最终就会查询不出来东西,因此需要配置动态 SQL 查询语句,判断 status 是否为 null。
<select id="selectByCondition" resultMap="brandResultMap">
    select *
    from tb_brand
    where
        <if test="status != null">
            status = #{status}
        </if>
        <if test="companyName !=null and companyName !=''">
            and company_name like #{companyName}
        </if>
        <if test="brandName !=null and brandName !=''">
            and brand_name like #{brandName}
        </if>
</select>
但这样有个问题,如果仅用到了 companyName 这个条件,拼接的查询语句就是 “where and company_name like #{companyName}”,不符合 SQL 语法了。
为了解决这个问题,可以使用两种方法
1. 恒等式
2. <where> 替换 where 关键字
用 标签比较优雅,替换掉 SQL 语句中的 where 关键字
<select id="selectByCondition" resultMap="brandResultMap">
    select *
    from tb_brand
    <where>
        <if test="status != null">
            status = #{status}
        </if>
        <if test="companyName !=null and companyName !=''">
            and company_name like #{companyName}
        </if>
        <if test="brandName !=null and brandName !=''">
            and brand_name like #{brandName}
        </if>
    </where>
</select>
单条件动态查询
和多条件实现的结果差不多,相当于是用户去选了某个 where 属性来生效
11、添加&修改功能
添加功能

void add(Brand brand);
这里并没有 insert into id 这个属性
<insert id="add">
    insert into tb_brand(brand_name, company_name, ordered, description, status)
    values (#{brandName}, #{companyName}, #{ordered}, #{description}, #{status})
</insert>
    @Test
    public void testAdd() throws IOException {
        int status = 1;
        String companyName = "阿里巴巴";
        String brandName = "阿里巴巴";
        int ordered = 1;
        String description = "des";

        Brand brand = new Brand();
        brand.setStatus(status);
        brand.setCompanyName(companyName);
        brand.setBrandName(brandName);
        brand.setOrder(ordered);
        brand.setDescription(description);

        // 1. 创建 SqlSessionFactory
        String resource = "mybatis-config.xml";
        InputStream inputStream = Resources.getResourceAsStream(resource);
        SqlSessionFactory sqlSessionFactory = new SqlSessionFactoryBuilder().build(inputStream);

        // 2. 获取 SqlSession 对象
        SqlSession sqlSession = sqlSessionFactory.openSession();

        // 3. 获取代理对象
        BrandMapper brandMapper = sqlSession.getMapper(BrandMapper.class);
        brandMapper.add(brand);

        // 提交事务
        sqlSession.commit();

        // 4. 释放资源
        sqlSession.close();
    }
其中别忘了手动提交事务
主键返回:
添加订单以后,想继续往订单里面添加对应的订单项,就需要拿到添加订单的主键 id

设置 useGeneratedKeys 和 keyProperty 两个属性进行回绑
 <insert id="add" useGeneratedKeys="true" keyProperty="id">
        insert into tb_brand(brand_name, company_name, ordered, description, status)
        values (#{brandName}, #{companyName}, #{ordered}, #{description}, #{status})
    </insert>
也不需要再去回查 brand 对象了,直接拿到原来构造的插入对象 brand.getId() 获取就可以了
// 3. 获取代理对象
BrandMapper brandMapper = sqlSession.getMapper(BrandMapper.class);
brandMapper.add(brand);
Integer id = brand.getId();
System.out.println(id);
修改功能
修改全部字段:
将需要修改的对象作为入参,传入 id 就是 SQL 配置文件中的 where id = #{id},最终返回修改成功的行数
int update(Brand brand);
<update id="update" >
        update tb_brand
        set
            brand_name = #{brandName},
            company_name = #{companyName},
            ordered = #{ordered},
            description = #{description},
            status = #{status}
        where id = #{id}
    </update>
  @Test
  public void testUpdate() throws IOException {
      // id
      int id = 6;
      int status = 1;
      String companyName = "阿里巴巴n";
      String brandName = "阿里巴巴";
      int ordered = 1;
      String description = "des牛逼牛逼";

      Brand brand = new Brand();
      // 直接将 id 填充进 brand
      brand.setId(id);
      brand.setStatus(status);
      brand.setCompanyName(companyName);
      brand.setBrandName(brandName);
      brand.setOrder(ordered);
      brand.setDescription(description);

      // 1. 创建 SqlSessionFactory
      String resource = "mybatis-config.xml";
      InputStream inputStream = Resources.getResourceAsStream(resource);
      SqlSessionFactory sqlSessionFactory = new SqlSessionFactoryBuilder().build(inputStream);

      // 2. 获取 SqlSession 对象
      SqlSession sqlSession = sqlSessionFactory.openSession();

      // 3. 获取代理对象
      BrandMapper brandMapper = sqlSession.getMapper(BrandMapper.class);
      // 会根据 id 去填充 SQL 语句
      int count = brandMapper.update(brand);
      System.out.println(count);

      // 提交事务
      sqlSession.commit();

      // 4. 释放资源
      sqlSession.close();
  }
12、删除功能
删除一个
int deleteById(int id);
<delete id="deleteById">
    delete from tb_brand
    where id = #{id}
</delete>
@Test
public void testDeleteById() throws IOException {
    // id
    int id = 7;

    // 1. 创建 SqlSessionFactory
    String resource = "mybatis-config.xml";
    InputStream inputStream = Resources.getResourceAsStream(resource);
    SqlSessionFactory sqlSessionFactory = new SqlSessionFactoryBuilder().build(inputStream);

    // 2. 获取 SqlSession 对象
    SqlSession sqlSession = sqlSessionFactory.openSession();

    // 3. 获取代理对象
    BrandMapper brandMapper = sqlSession.getMapper(BrandMapper.class);
    int count = brandMapper.deleteById(id);
    System.out.println(count);

    // 提交事务
    sqlSession.commit();

    // 4. 释放资源
    sqlSession.close();
}
批量删除
delete from tb_brand
where id
in (?,?,?)
int deleteByIds(@Param("ids") int[] ids);
<!--  mybatis 会将数组参数,封装为一个 Map 集合
 * 默认: key = array  value = 数组
 * 使用 @Param 注解改变 Map 集合的默认 key 的名称

-->
<delete id="deleteByIds">
    delete from tb_brand
    where id in
    <foreach collection="array" item = "id" separator="," open="(" close=")">
        #{id}
    </foreach>
</delete>

<delete id="deleteByIds">
    delete from tb_brand
    where id in
    <foreach collection="ids" item = "id" separator="," open="(" close=")">
        #{id}
    </foreach>
</delete>
@Test
public void testDeleteByIds() throws IOException {
    // id
    int[] ids = {10};

    // 1. 创建 SqlSessionFactory
    String resource = "mybatis-config.xml";
    InputStream inputStream = Resources.getResourceAsStream(resource);
    SqlSessionFactory sqlSessionFactory = new SqlSessionFactoryBuilder().build(inputStream);

    // 2. 获取 SqlSession 对象
    SqlSession sqlSession = sqlSessionFactory.openSession();

    // 3. 获取代理对象
    BrandMapper brandMapper = sqlSession.getMapper(BrandMapper.class);
    int count = brandMapper.deleteByIds(ids);
    System.out.println(count);

    // 提交事务
    sqlSession.commit();

    // 4. 释放资源
    sqlSession.close();
}
13、参数传递
多个参数进行传递查询的时候
List<User> selectByCondition(String username, String password);
如果不通过 @Param 注解对其进行标注,直接使用类似下面的语句进行查询
<select id="selectByCondition" resultType="user">
    select *
    from tb_user
    where username = #{username}
    and password = #{password}
</select>
会抛出如下异常:
Cause: org.apache.ibatis.binding.BindingException: Parameter ‘username’ not found. Available parameters are [arg1, arg0, param1, param2]
简单来说就是找不到传递入参的映射关系了
但是 SQL 配置文件查询语句改成如下就可以查询出来的东西
<select id="selectByCondition" resultType="user">
    select *
    from tb_user
    where username = #{param1}
    and password = #{param2}
</select>
其主要原因在于多个参数传递的时候,Mabatis 在进行参数解析的时候,会将入参封装为 Map 集合,比如两个入参则会做如下操作
map.put("arg0", 参数值1)
map.put("param1", 参数值1)
map.put("arg1", 参数值2)
map.put("param2", 参数值2)
源代码在 org.apache.ibatis.reflection.ParamNameResolver#getNamedParams 中
public Object getNamedParams(Object[] args) {
    final int paramCount = names.size();
    if (args == null || paramCount == 0) {
      return null;
    } else if (!hasParamAnnotation && paramCount == 1) {
      Object value = args[names.firstKey()];
      return wrapToMapIfCollection(value, useActualParamName ? names.get(0) : null);
    } else {
      final Map<String, Object> param = new ParamMap<>();
      int i = 0;
      for (Map.Entry<Integer, String> entry : names.entrySet()) {
        // map.put("arg0", 参数值1)
        param.put(entry.getValue(), args[entry.getKey()]);
        // add generic param names (param1, param2, ...)
        final String genericParamName = GENERIC_NAME_PREFIX + (i + 1);
        // ensure not to overwrite parameter named with @Param
        if (!names.containsValue(genericParamName)) {
          // map.put("param1", 参数值1)
          param.put(genericParamName, args[entry.getKey()]);
        }
        i++;
      }
      return param;
    }
  }
如果使用 @Param 注解
List<User> selectByCondition(@Param("username") String username, String password);
arg0 会被替换为 username
map.put("username", 参数值1)
map.put("param1", 参数值1)
map.put("arg1", 参数值2)
map.put("param2", 参数值2)